Do you record sessions in Zoom that you want to share with your class? Perhaps you are already sharing Zoom recordings, but you are curious if there’s a better or right way to do it, or you just want to know your options.
You are in luck! This week’s post describes how to manage your Mt. SAC Zoom recordings when shared directly from within Canvas.
When to Share Zoom Recordings
Many professors use Zoom for live “synchronous” class sessions, but some may use it in other ways, such as to record just the lecture portion of a class or as a Zoom “meeting of one” specifically to make a screencast or webcast video. One size doesn’t fit all when it comes to Zoom meetings, so different solutions may work best when sharing Zoom recordings–and there are options! However, one thing is universally true for all Zoom recordings: Zoom is not meant for long term video storage.
Start with Good Practices by Knowing the Rules
If you plan to share recordings from live Zoom sessions, you probably want to start by reviewing what is okay to share and what you should not share to stay in compliance with various policies and laws. Start by reviewing (and saving a copy of) the
Distance Learning Committee (DLC)’s recommendations on sharing recordings of live class sessions so you can avoid any regulatory concerns.
Sharing Zoom recordings depends on two things:
- whether students appear in the video in any form: image, voice, or name, and
- where you are sharing it.
Video and audio is considered personally identifying information so it has potential FERPA implications.
Although Zoom does inform attendees and ask them to consent to recording as they join the meeting (you can toggle this on and off as a setting in Zoom), agreeing as you enter a meeting may seem a bit of a forced choice since the only other option is to not attend, and that may not really seem like an actual option to opt out. For this reason, having a discussion with students about what will be recorded and how it will be shared is a good practice, and you may want to have students give consent or opt out separately from the automatic notice given at the point when they join a meeting.
It is typically fine to share class recordings within the class itself–just be sure it is only shared with the class. And you may want to make sure your Zoom settings don’t let copies run loose if students are allowed to download the recordings. That brings us to…
Recording and Sharing in Zoom
TechConnect Zoom is integrated within Canvas, but for the full menu of settings preferences, you have to go outside of Canvas and log directly into the Mt. SAC Zoom account. With the newly introduced LTI, every Mt. SAC Canvas user should have automatic SSO access to Mt. SAC Zoom through Cavnas. This is a part of the CCC TechConnect Zoom system. Our account URL is
mtsac-edu.zoom.us/.
If you go to this URL, clicking “sign in” on the home page takes you to your Mt. SAC portal login page. Once you are logged in, you can review all Zoom settings under the left-side “Settings” menu. Since we are focused on recording here, I’m just going to mention a few recording-related settings.
Here are some of the options in the Recording Settings:
- you can opt to save recordings to the Cloud (aka in online storage) or on your local hard drive.
- Zoom sessions saved in the Cloud can be saved directly from Zoom and downloaded as mp4 video files (more on that later).
- If local recording is selected, the video saves to your local computer hard drive instead.
There may be some benefits to recording in the cloud, especially if you don’t have a lot of extra space on your hard drive–videos can be space hogs. If you do save to the Cloud, you need to be mindful to clean these up at least twice a year to help Mt. SAC and the CCC manage the overall storage space. The college has not yet set specific parameters on when older videos will be deleted to create room, but there are some space issues arising from the widespread use of Zoom, so considering the workflow options below can help you make clockwork of your Zoom video storage and sharing process and never lose videos you want to keep.
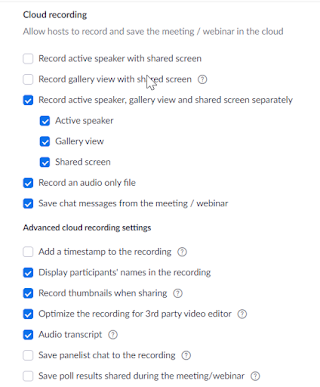
Cloud Recording Settings
Zoom Cloud Recording Settings let you to make some choices about what and who gets recorded. Regardless of what displays on screen during the session, the recording captures what you set it to record in the settings. You can choose to just capture the active speaker and screen shared materials rather than the gallery view, which will reduce the appearance of students in the video.
There’s even an option to collect separate video files for the speaker, gallery view (of participants) and any shared screens rather than mixing them in one video.
Video files will include the sound, but you have the option to also collect an audio-only file separately so you could opt to edit or share the audio only if that would be useful in your scenario. You can also choose whether the video is timestamped and if it includes participant names and captures the audio transcript, chat, or any polling that was used.
The settings also let you decide if recording starts automatically. This can be great if you mostly use it for sessions you want to record, but it can create a lot of Zoom waste that you need to clean out if you find you are starting sessions and then turning it off, resulting in many short recorded video clips.
Sharing recordings directly from TechConnect Zoom (in Canvas)
Professors can share Zoom meetings with students directly from within Canvas. There is a tab called “Cloud Recordings” on the menu in Canvas TechConnect Zoom. Clicking on it displays recordings. There is also a link to display all of your Zoom Cloud Recordings. Under the three dots, you can import or dissociate specific meetings with the current course.
Publishing to Share
At the end of each recording is a “publish” button. If you toggle it on, you have shared this recording with students in this area of the TechConnect app in Canvas. Students can view the video recording of the Zoom session. For items that are toggled on, students see the item but do not have the same options to publish or download that professors have:
Clicking on the meeting link here will take students to this screen, where they can copy the passcode and click on the thumbnail to watch the video in the Zoom recording interface. You may want to provide instructions to click on the Cloud Recording tab and copy the passcode, then click on the thumbnail to watch any recordings you share here.
Zoom and Video Download Capabilities
We are reviewing the settings that would allow us to set a default so that videos cannot be downloaded as a default, but right now the default does allow videos to be downloaded. You can adjust this setting but it must be set for each video as of now. To adjust this setting. you must log in to Mt. SAC Zoom outside of Canvas. Click on Recordings and then click “share” in the line of the video for which you wish to adjust settings.
Back in TechConnect Zoom within Canvas, you can see published entries show all items that were turned on to record in the settings. In the example pictured below, three items appear: a video of the active speaker (left) and shared screen (center) were captured in separate videos (each has the sound in it as well). The last option (right) is audio-only, since that option was also selected. If you wanted to opt to only share one of these, you do not have that option from within the Zoom app in Canvas. You would need to select one of the other options for sharing explained below in Options 2-4.

Sharing a Specific item from the thumbnail
When a professor clicks on the blue link in the list of recordings within TechConnect Zoom, he or she will see options to download or share the associated files. Depending on your settings, this may include a video and an audio sharing option, pictured here.
You can also opt to share from this location by copying the share link and passcode and sending it to students by announcement, email, or placing in a course location. However, there is no direct way to embed Zoom videos in Canvas. Those options are described below.
To share a recording link outside of the TechConnect Zoom app:
- Navigate to TechConnect Zoom and identify the recording you wish to share.
- Click the blue name of the recording in the Cloud Recordings list. or search and filter to find the correct item.
- To share from Zoom directly, click “Share.” You will receive a link to share with your class and a passcode that is needed to access the content at that link. Make sure you give students the passcode or they will not be able to access the recording.
- Note that Zoom does not offer a direct way to embed the video in the course. The video stays in Zoom, and the link takes the students to that location in Zoom to watch the video.
- Sharing by this method appears to give students the option to “Download” a copy of the video in the upper right corner. While videos shared from the web version of Zoom allow some control, there does not appear to be a way to toggle this off in the settings.
PROS and CONS
Sharing from directly within Zoom has the advantage of being easy. It is available right in your course to share with students. It also will pick up the machine captions and add those along with the smart transcript to the video.
It has a few disadvantages too though. First, this method just provides a link to a Zoom interface rather than being embedded within your course. Other options (below) allow embedding. Second, even though it adds captions from the live session, those captions almost certainly need some editing to make them ADA-compliant to the standard. At minimum, checking spelling, punctuation, capitalization, and adding any non-word sounds so that it meets a high level of accuracy is important to truly be accessible. Third, the inability to control the “download” option here may be a serious downside to avoid. At minimum, you may want to be clear in writing with the class about the expectations of how any content would be treated. Last but not least, this option is only for short-term sharing. Remember: Zoom is not long-term storage. If you share this way, you should consider downloading any videos you want to save at the end of the term and deleting them out of Zoom to maintain good storage habits and avoid the loss of any content or a lot of work to download lots of content later once clear deletion policies are in place.
Sharing from Zoom Outside of Canvas
It is also possible to share links from within TechConnect Zoom to locations outside of Canvas. You do this by accessing
Mt. SAC Zoom directly, going to Recordings, and choosing to share. Here you have a few options and our next blog post will explain them all!
Have more questions about sharing recordings from directly within Canvas TechConnect Zoom? Do you do it another way? Have any tips for making the most of Zoom Recordings? Share it with FCLT in the comments below!
Faculty Center for Learning Technology | Mt. San Antonio College
Related