
Today I will be showing you how to quickly and easily migrate any of your captioned videos from Canvas Studio to alternate video hosting platform. It’s no secret that at Mt. SAC we have access to several different video recording and hosting platforms. Canvas Studio, Screencast-O-Matic, and 3C Media immediately come to mind. Additionally, there are several other video hosting options exist for free outside of Mt. SAC. Examples of those would be YouTube or Vimeo. The platform you choose to migrate to is ultimately up to you, however for the purposes of this demonstration I will be using Screencast-O-Matic and 3C Media, both tools that are currently funded for faculty use at Mt. SAC.
Why do I need to migrate my videos?
To put it frankly, funding for technology tools isn’t guaranteed and unfortunately that can sometimes lead to the discontinuation of certain tools based on factors related to usage and cost. Like I briefly mentioned above, at Mt. SAC we have access to several different tools capable of recording and hosting videos, so a tool such as Canvas Studio is unfortunately put into a position where it can quickly become a candidate for discontinuation due to its higher-than-average cost for this type of tool. That doesn’t mean we will be losing access to Canvas Studio tomorrow or anything, and in fact Canvas Studio was just recently renewed for another year at Mt. SAC, meaning we will have it until at least June 30th 2023. It does, however, add a tiny amount of urgency knowing that it CAN happen at some point in the future. So it’s good to have an “exit strategy” for migrating all of the wonderful content you’ve uploaded into Canvas Studio. After all it’s video, and thus it’s possible for you to move it to another platform of your choice without having to re-record or caption it.
Downloading from Canvas Studio
The first part of this process involves downloading the video you wish to migrate from Canvas Studio. This will not remove it from Canvas Studio; this will simply download a copy of the video file (.MP4 file) onto your computer. First start by going into Canvas Studio and locating the video you wish to download. Then:
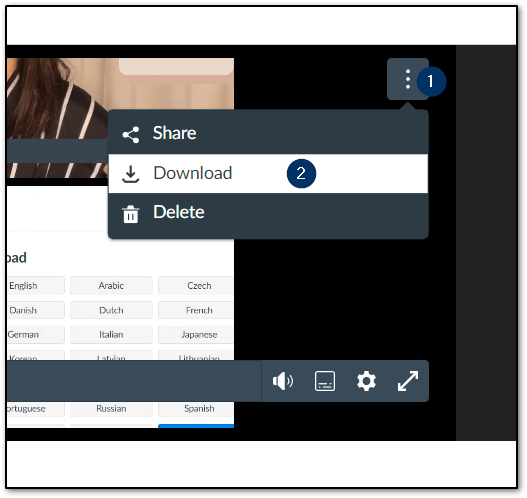
In addition to the video file, you will need to also download the captions file (.SRT file).
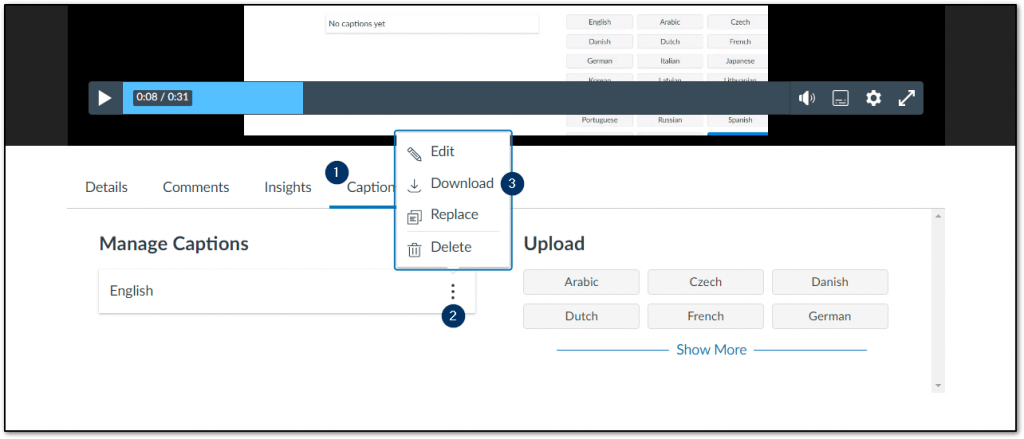
At this point you have downloaded both the video and the captions files to a location on your computer. The captions file likely downloaded in the form of a ZIP document, so it will require for you to unzip it prior to seeing the .SRT file. At this point you are ready to upload both files to any streaming platform of your choice.
Uploading to 3C Media
3C Media is an educational media repository and video platform. It’s like YouTube but for the California Community Colleges system. It’s an excellent option for storing video files because they can easily be shared in Canvas through the 3C Media LTI. A 3C Media account is required but the account creation process is free and easy. Visit the Canvas Faculty Center to learn more about 3C Media and how to use it in Canvas. Additionally you can checkout the useful 3C Media how-to guides available from CCC TechConnect.
Once your captioned video has been uploaded to 3C Media, you can reference CCC TechConnect’s useful guide on using 3C Media in Canvas for information about how to share videos to your students.
Uploading to Screencast-O-Matic
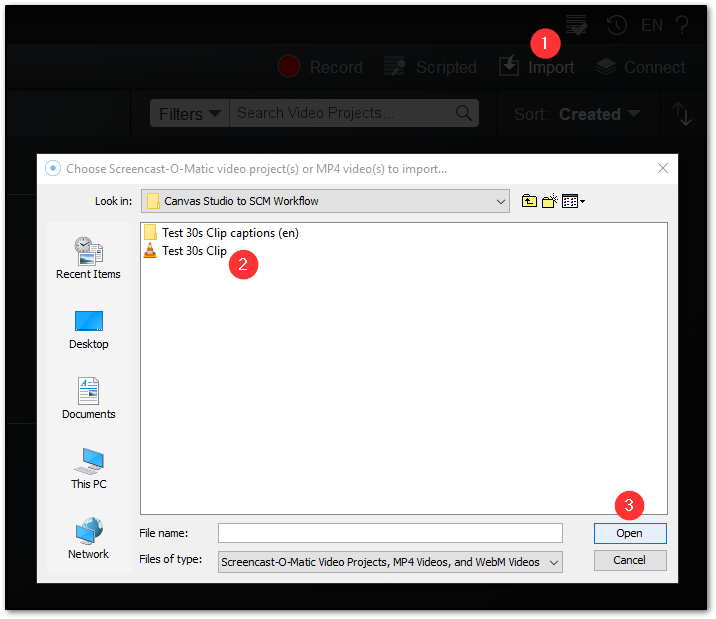
Screencast-O-Matic is a screen recording and video sharing tool available for free to Mt. SAC instructors. It gives users the ability to record videos, edit them, and share them via unique URL link, or directly into Canvas using the Screencast-O-Matic LTI tool. Importing Canvas Studio videos into Screencast-O-Matic will require that you first setup your account, and download the Screencast-O-Matic application to your computer. For full instructions on how to do that please visit the Canvas Faculty Center. After you have downloaded the application, do the following:

From here you will get another similar pop-up asking you to browse your computer for the captions SRT file. Select the file to have the captions applied to your video. Then finally click “ok” to confirm the captions. The final step involves uploading the video to Screencast-O-Matic which I recommend watching the short 2-minute video on how to do that. Once your video has been uploaded to Screencast-O-Matic, it can be shared to your students through the Canvas LTI app.
Uploading to Other Platforms
The great news is that the general process remains the same for YouTube or other video streaming platforms if you wanted to migrate your Canvas Studio videos there. The basic workflow remains the same: download your video/captions -> upload your video/captions. Every platform will have their own ways of doing things, so always consult their support documentation for the specific step-by-step instructions.
How can FCLT help?
Come visit us! Feel free to drop by our open Zoom Office Hours on Thursdays from 2-3 PM or email FCLT@mtsac.edu for an individual appointment!